Starting to sew your own clothes using sewing patterns is an excellent way to dive into the world of garment making. Patterns provide a structured guide, complete with step-by-step instructions and a shopping list for fabric and supplies, making the process easier to follow. With each project, you’ll build confidence, learn new techniques, and develop essential sewing skills—from reading pattern markings to mastering different stitches and finishes.
Sewing Patterns -
easier than you think!
Let’s start with the front of the envelope:

You’ve chosen your first pattern, and you’re in love with the design. Now, let’s get to work!
Sewing patterns come in a size range (for printed patterns) or a single size (more common in PDF patterns). Keep in mind that your size in a sewing pattern may differ from the clothing sizes you buy in stores. Be sure to measure yourself and check that you fall within the pattern’s size range.
If you’re buying a pattern for a jacket, shirt, or blouse, you only need your bust measurement. For pants, skirts, or shorts, use your hip measurement. When it comes to dresses or coats, you’ll need both your bust and hip measurements.

Now for the back of the envelope:

When shopping for fabric for your sewing pattern, start by checking the suggested fabrics listed in the pattern instructions. These recommendations are carefully chosen to ensure the garment drapes, stretches, and behaves as intended. Using them as a guide helps you select the right fabric for a successful outcome. If you're unfamiliar with certain fabrics, this is a great opportunity to learn! Visit a fabric store and feel different materials, paying attention to their weight, texture, and stretch. Over time, you’ll start to recognize how different fabrics work for various designs, making it easier to choose the perfect fabric for future projects.
What is interfacing?
Interfacing is a material used in sewing to add structure, stability, and support to fabric. It is commonly applied to areas like collars, cuffs, waistbands, and button plackets to prevent stretching and help the garment hold its shape. There are two main types: fusible interfacing, which has an adhesive side that bonds to the fabric with heat from an iron, and sew-in interfacing, which is stitched in place for a softer, more flexible finish. Interfacing also comes in different bases, such as fabric-based, which is more flexible, and paper-based, which is crisper and used for more structured projects.
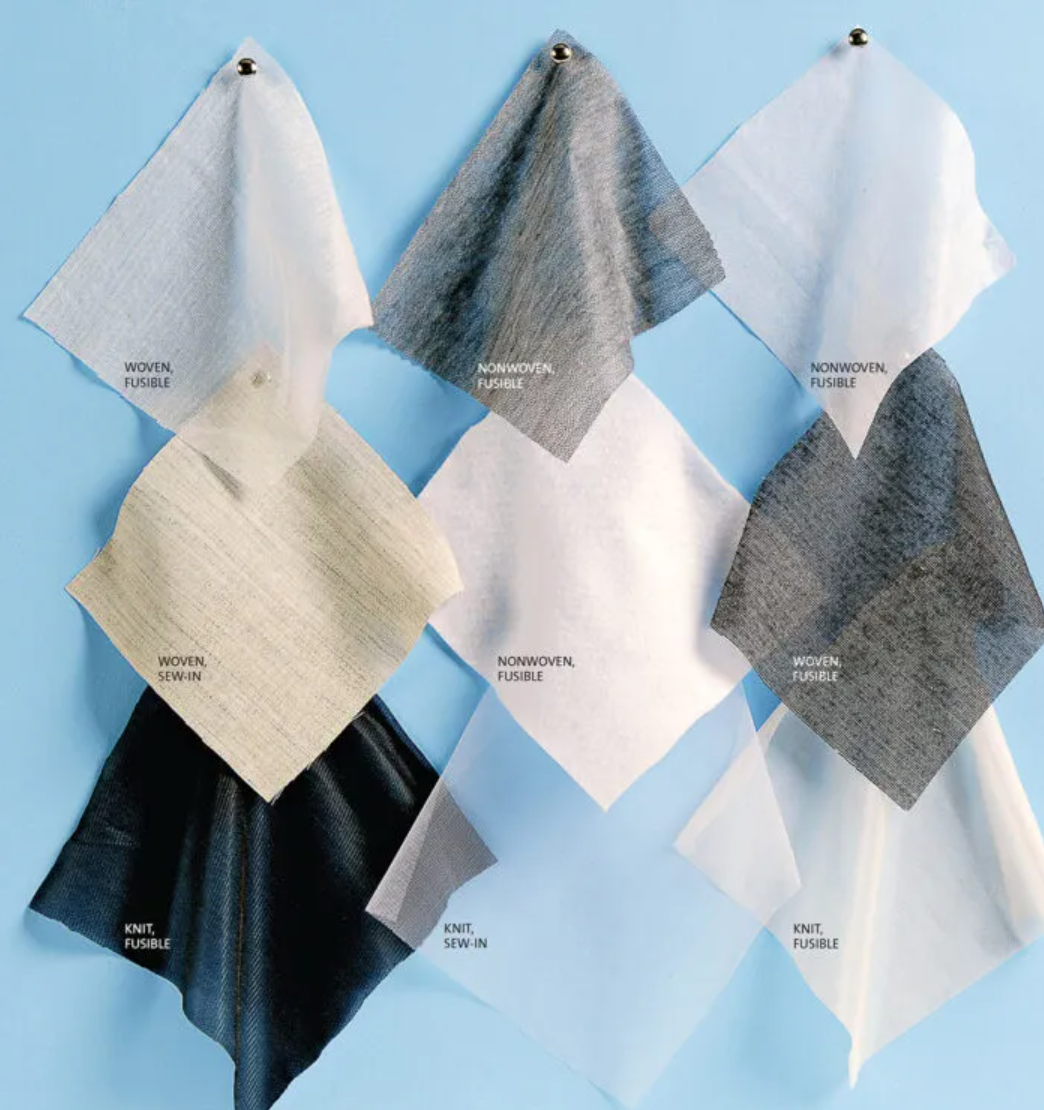
For stretchy fabrics, knit interfacing is the best choice. Unlike traditional woven or non-woven interfacing, knit interfacing has built-in stretch, making it ideal for stabilizing knits and jersey fabrics without restricting their flexibility. It is most commonly fusible and should be applied with care to avoid overheating and shrinking.
Choosing the right interfacing is essential—always match the weight of the interfacing to the weight of your fabric. A lightweight interfacing works best for delicate fabrics like chiffon, while a heavier interfacing is needed for structured fabrics like denim or wool. For stretchy fabrics, knit interfacing maintains the fabric's natural movement while providing the necessary support. Testing a small piece on your fabric before sewing can help ensure the right feel and finish for your project.

Back to the envelope:

Let’s start with a nap—but not the kind that involves a cozy blanket and a nap-time alarm!
In sewing, fabric nap refers to the texture or directional pattern of a fabric, which affects how the fabric looks when cut and sewn. Fabrics like velvet, corduroy, and faux fur have a raised surface that appears darker or lighter depending on the direction it’s viewed from. Similarly, prints with an obvious one-way design (like flowers all facing upward) also have a nap. When working with napped fabric, all pattern pieces must be cut in the same direction to maintain a consistent appearance, which often requires extra fabric. That’s why sewing patterns specify "with nap" yardage—so you don’t end up with mismatched shading or upside-down prints on your final garment!
How much fabric should you get?
Sewing patterns usually include a fabric requirement chart that tells you exactly how much fabric you need for each size. This measurement is based on the pattern pieces fitting within that amount when laid out as instructed. However, there are a few reasons why you might want to buy extra fabric:
Pre-washing shrinkage – Many fabrics shrink after the first wash, so it’s a good idea to get extra to account for this.
Pattern matching – If your fabric has stripes, plaids, or large prints, you’ll need more fabric to align the design properly.
Directional fabric (nap) – If your fabric has a nap or a one-way print, all pieces must be cut in the same direction, which may require additional yardage.
Mistakes or adjustments – If you're new to sewing or plan to make fit adjustments (like lengthening a dress or adding pockets), having extra fabric can save the day.
A good rule of thumb is to purchase an additional 10-20% more fabric than recommended, just in case. It's always better to have a little extra than to run short!

We are not done with your shopping list just yet!
Notions are the extra sewing supplies needed to complete a project beyond fabric and thread. These can include buttons, zippers, elastic, interfacing, snaps, hooks, and trims—essentially anything that helps shape, fasten, or finish a garment. Sewing patterns usually list the required notions in the instructions, so be sure to check before starting.

Finished garment measurements:

Before purchasing a sewing pattern, it's a good idea to check the finished garment measurements, which are often listed on the pattern envelope or instructions. These measurements show the actual size of the completed garment, including any built-in ease (extra room for movement and fit). Standard pattern sizes can sometimes be misleading, as they don’t always match ready-to-wear clothing sizes. By comparing the finished measurements to your body measurements, you can determine if the garment will fit as expected or if adjustments are needed. This is especially important if you prefer a more fitted or oversized look, or if you want to ensure the right fit at key points like the bust, waist, and hips.
I hope you found this information helpful.
If you would like to learn how to work with a sewing pattern - check out my class:
“Learn to Sew Clothes” where we explore commercial sewing patterns even further.
See you in class!
Karolina